Mac Image Recovery
Often users discover that their precious data has been rendered inaccessible from the partitions of their Mac drive. This can happen because of virus attacks, file corruptions, unreadable drive, unmountable volumes and errors within the HFS or HFS+ files.
Next to notes and word processor files, images are the most popular and the most commonly stored data category. So there is a high probability of losing shots and clicks that capture cherished memories or stand testament to achievements.
Under such circumstances there is the need of a powerful recovery software or application that can retrieve image files, irrespective of the reason behind the loss. Stellar Phoenix ticks all the checkboxes. It is a light weight and effective Macintosh image recovery software which can scan for image files in a number of modes each suited to a particular scenario like loss due to deletions, general loss and loss due to virus corruption.
The 5 Steps to Mac Image Recovery with Stellar Phoenix
1. Launch Stellar Phoenix and choose the first option ‘Start New Scan’ to ensure that the scan is triggered from scratch.
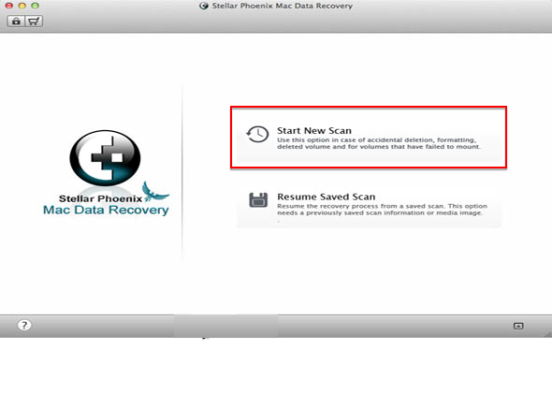
There is also the provision of using a .dmg file for ‘Resume Saved Scan’. Here, the progress of a previously initiated scan is saved or documented and the system can take up from where the disruption had halted the process.
2. The very next screen is referred to as the “selection screen”. Users have the ability to specify the drive that they want scanned, the scanning method, and the scan mode.

– The first selection is around the drive that has to be searched for Mac image recovery. The panel to the left lists out all the memory units that have ever been connected to Stellar Phoenix. Look up and choose the hard drive of the Macintosh supporting the system. The storage space that is selected is immediately highlighted in blue.
– The second selection pertains to the scanning method. ‘Data Recovery’ is a good bet for general image retrieval. If the images have been accidentally deleted, ‘Deleted Recovery’ is the ideal fit. If the images are a part of a drive that has been severely corrupted, the powerful ‘Raw Recovery’ option is desirable.
– The third selection revolves around choosing the scan mode. For this tutorial, ‘Quick Scan’ is appropriate for a scan that is expected to recover deleted items.
With all the configurations in place, click ‘Start Scan’ and the process will start immediately.
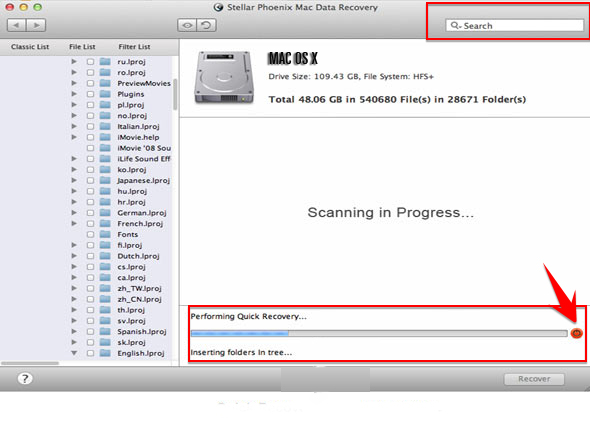
3. A scan that is underway is denoted by a progress bar with the time to completion. There is a ‘Stop’ symbol to the right which can be used to prematurely terminate the scan. Stellar Phoenix uses the display to the left to list out the images (along with other data) that it identifies for recovery from the intended storage or partition. You can peruse these items and recover important images on the fly, without waiting for the scan to complete. In order to make this possible, it is necessary to disrupt the ongoing process and save the progress as a .dmg file.
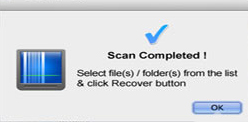
4. A successfully completed scan ends with the following pop-up. Simply hit ‘OK’ to move on to the display screen where files can be chosen individually or in bulk by using the appropriate checkboxes.
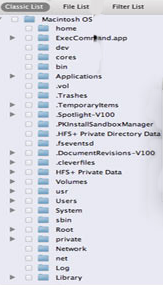
There are three data views or lists that make searching for specific images easier. Please do note that a search bar is present to the top right and this can be used to call up images by name and keywords.
– The Classic List is simple because it replicates the organization of the data (images) in the Macintosh drive before data loss. Individual files and sub-folders are found in the same main folders in which they resided before being rendered inaccessible.
– The File List is the easiest one to navigate. The main or primary folders here correspond to broad data categories like Images, Audio, Video and Executable Files. The sub-folders within these primary folders stand for specific data types of these categories.
The Image primary folder will have sub-folders labeled PNG, JPEG, GIF and PSD and these folders in turn will hold the individual files which can be examined and previewed to the right of the screen.
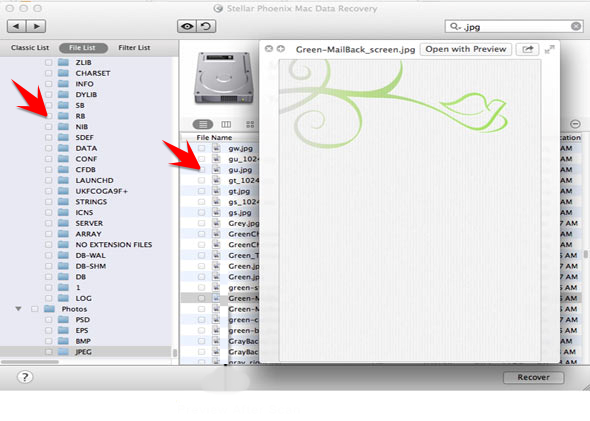
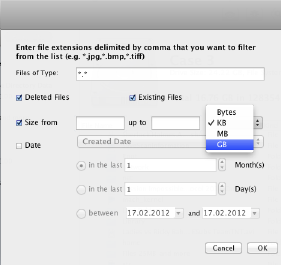
– The Filter List uses criteria like File Type, File Size and Date of Creation to narrow down particular folders and images that match these qualifiers.
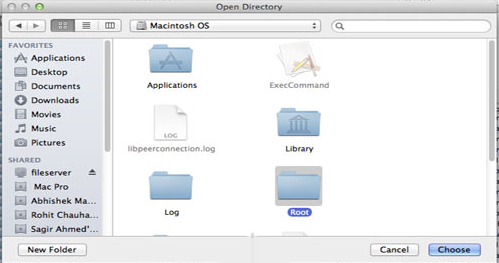
5. Last but not the least, click ‘Recover’ and select the location where you would like to save the photos. It shouldn’t be on the drive that lost them, so an external USB stick or hard drive is the best option.
![]()
Mac image recovery with Stellar Phoenix needs no technical expertise and is completed primarily on auto-pilot. Recapping the sequence:
- Launch Stellar Phoenix and select ‘Start New Scan’.
- Choose the drive to be scanned, the scanning method and mode.
- Allow the scan to complete.
- Select the needed image files.
- Restore them to a reliable storage medium.