Recover Data From Unreadable Mac Hard Drive
Easy Way to Recover Data From Unreadable Mac Hard Drive
Has this ever happened to you? You start up your Mac computer but can’t access the hard drive because ‘the location is not available’. The first reaction is panic because our data is mostly stored in hard disk partitions and folders. Very few people are regular with their backups and for an instant it seems like the images, videos, files and software solutions are lost forever.
This is the common problem of an unreadable Mac hard disk! It might be the result of drive mishandling, virus corruption or undiagnosed errors that afflict almost all tech equipment at one point of time or the other and is a hassle for users without thorough knowledge of recovery strategies.
Not anymore!
Meet Stellar Phoenix Mac Data Recovery. A third party application that is light weight and agile, it can recover data from unreadable Mac hard drive and partitions with ease in just five simple steps.
Five Steps to Mac Data Recovery with Stellar Phoenix
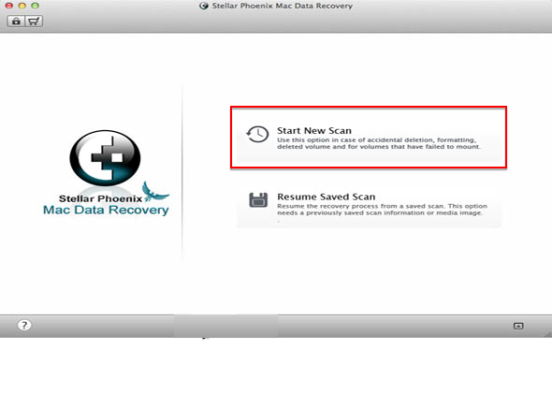
1. Launch Stellar Phoenix and choose the option ‘Start New Scan’ on the home screen. This will trigger a search for the unreadable items from scratch. ‘Resume Saved Scan’ is useful when a previously initiated process has been disrupted. A .dmg file is automatically created and it documents the progress of the scan so that the system can take up the search and save precious time, especially if large volumes of data have to be salvaged.
2. The next screen is the selection screen. Here you must make three sets of choices and customize how the scan will be conducted and the resources that will be used in the scan.

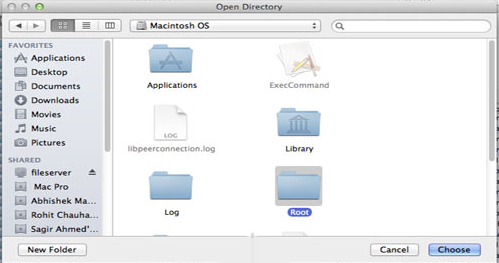
- The first selection revolves around the actual drive to be probed. Stellar Phoenix offers users a list of storage media or units that have been connected to the system in the past, including the drive of the Mac supporting it and any external storage devices specifically attached with a USB cord for the purpose of recovery. For the instance of this tutorial, the Mac OS X drive has to be chosen. It is immediately highlighted in blue.
- The second selection pertains to the scanning method. For retrieving data from an unreadable partition, Data Recovery is a good fit. ‘Deleted Recovery’ refers to the process of salvaging only the items that have been explicitly deleted. It is not a very probing scan. ‘Raw Recovery’ can repair a partition that is severely corrupted and then restore its contents. However it also takes the most time to complete.
- The third selection is that of the scan mode. A Quick Scan is ideal for a ‘Deleted Recovery’ session. For the other two options, ‘Advance Scan’ that delves deeper makes more sense.
With the choices fed into the system, hit ‘Start Scan’ and the process starts immediately.
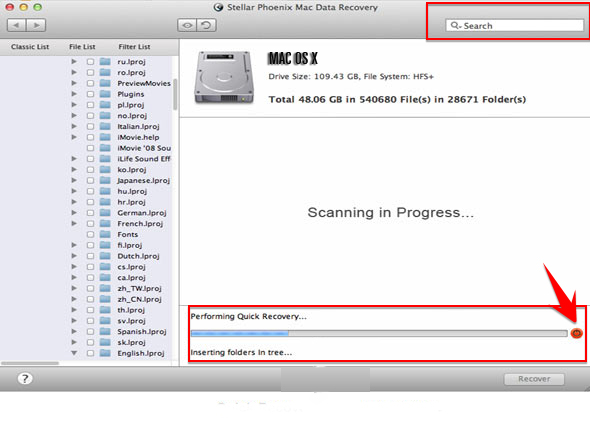
3. A scan underway is denoted by a progress bar with the time to completion and a Stop symbol to its right. Stellar Phoenix displays the data in the unreadable Mac partition identified for retrieval in real time to the left of the screen and you have the flexibility to peruse these items. If you spot a file that is of exceptional importance, you may choose to terminate the scan midway with the ‘Stop’ button and automatically create a .dmg file for use at a later date. Disrupting a scan is necessary because ‘Recover’ isn’t clickable otherwise.
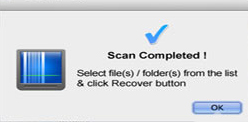
4. When the scan completes in its own time, a pop-up shows itself declaring the success of the process. Hit OK and allow the display screen to come on.
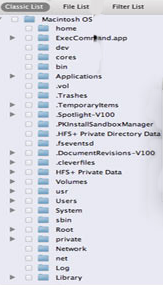
This is where users can select items individually or in bulk by choosing a folder, drilling down to the files and items and then ticking the appropriate checkboxes. The search bar to the top right of the screen is used to call up files by name or keyword. There are three convenient Lists or file views that you can access:
- The Classic List is the simplest view. Here the files and items are organized in a way that replicates the organization in the unreadable Mac prior to the data loss. Thus if you are looking to salvage files from a folder that was named ‘My Photos’, you must click on the ‘My Photos’ container from the Classic List and then make your selection to the right.
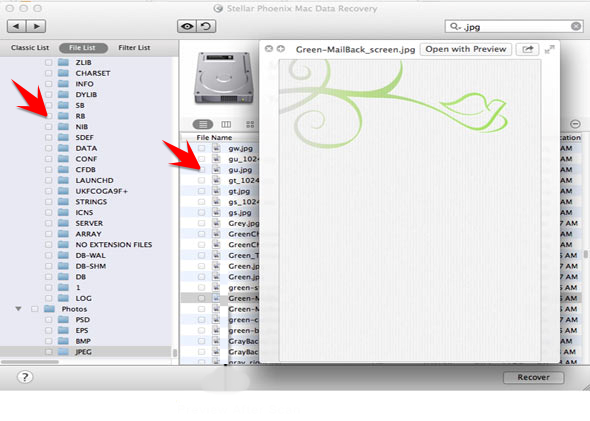
- The File List is easy to navigate. It has Primary folders, which when clicked, expand to display Secondary sub-folders. Each Primary folder stands for a broad data category like Image, Video, Executable Files and Audios, to name a few. And the Secondary folders correspond to the data types under the umbrella of the data category. So the Images folder may have sub-folders running the gamut from JPEG and PNG to GIF and PSD.
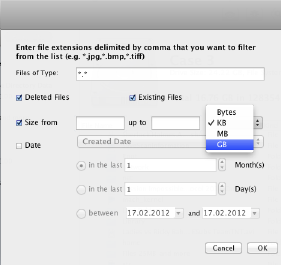
- The Filter List is the most advanced option. You can use criteria like File Type, Date of Creation and a size range to zero-in on very specific items.
5. Once all the relevant files (or bulk folders) are selected, it is time to click Recover and save the retrieved information to an external hard drive or a USB stick because the Mac disk is unreadable and thus unreliable.
![]()
And there you have it! A pressing concern like an unreadable Mac hard drive is resolved in a relatively short period of time, thanks to Stellar Phoenix Mac Data Recovery. Here is a recap of the sequence:
- Launch Stellar Phoenix and click on Start New Scan
- Next choose the drive to probe, a scan method and the scan mode
- Allow the scan to complete
- Tick the files that need retrieval from any one of the three views or lists
- Recover items to an external memory medium