How to Recover iTunes Playlists
iTunes has this annoying “feature” where sometimes when you’re switching your iTunes over to a new device, you lose all your playlists. If you’ve just switched over to a new machine and you’re having difficulty finding all your old playlists, it’s because they haven’t been transferred across properly.

While Apple products are great with doing other things smoothly, their iTunes syncing often leaves a lot to be desired. What this can mean for you is that you need to follow some extra steps to recover all your old playlists.
Don’t worry too much, the steps aren’t exactly rocket science how to recover iTunes playlists. Here’s what you will need (either of these two) if you’re having problems on a new computer.
a) Your old computer that had all your old iTunes playlists on it
b) An iPhone, iPad, or iPod that has all your playlists on it
While it’s preferable you have your old computer around to do this transfer, sometimes that won’t be the case: you could have sold it or given it to someone after formatting your hard drive or it’s simply dead. If this is the case, you will need to use your Apple device with the playlists on it instead.
Here’s what you’ll need for issues with your iPhone/iPad/iPod:
- Your device
- Your computer with iTunes installed
Here’s how to recover iTunes playlists when you’ve lost them after switching over to a new computer.
If you still have your old computer and files accessible
Method 1 (all files including music):
Step 1. Open up iTunes on your old computer.
Step 2. Open the Menu at the top left and select File > Library > Organize Library.
Step 3. Select the “Consolidate files” option and then OK to ensure you grab everything.

Step 4. Find C:\Users\<YOUR NAME>\Music\iTunes on your old computer.
Step 5. Copy the entire folder to an external hard drive or USB stick.
Step 6. Remove the external hard drive or USB and plug it into your new computer.
Step 7. Copy the iTunes folder from your external hard drive or USB stick and copy it into your ‘My Music’ folder.
Step 8. Open iTunes to migrate all your data.
Method 2 (where your music has already appeared on the machine but not your playlist details, comments, etc.):
Step 1. Locate C:\Users\<YOUR NAME>\Music\iTunes on your old Windows machine.
Step 2. Find “iTunes Library.itl” and “iTunes Music Library.xml”.
Step 3. Copy these two files to a USB stick or external hard drive.
Step 4. Unplug the device and plug it in to your new machine.
Step 5. Copy the two files over to C:\Users\<YOUR NAME>\Music\iTunes on your new machine, replacing the files that exist there already.
If you have your iPod or iPhone with your playlists on it handy
When you no longer have your old machine handy but what you have is an iPhone, iPod, or iPad with all your playlists in them, you can also sync your computer to your phone to retrieve your playlists that way.
To use this method of playlist retrieval, you’ll need to download a third party software. We use TunesGo by Wondershare to extract the playlists from your phone or Apple device and transfer them to your computer.
Step 1. Download and install TunesGo onto your Windows or Mac machine.
Step 2. Open up the TunesGo software.
Step 3. Plug your Apple device into your computer using its data cable.
Step 4. TunesGo will recognize your device and display the name.
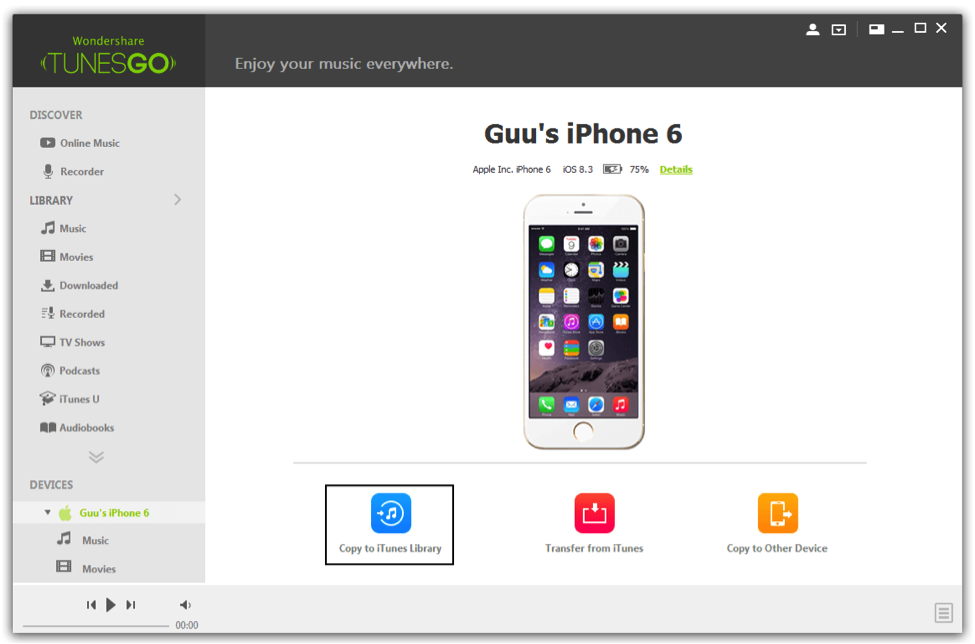
Step 5. Select Transfer Music.
Step 6. Pick the playlists that you would like to send to your computer’s iTunes and then select Export > Export to iTunes.
Step 7. Open iTunes and your playlists will all be there.
When you’ve lost your playlists on your iPhone/iPad/iPod
Apple’s iCloud feature can mess with your playlists, changing and removing songs and artwork, and deleting playlists. Here’s how to recover iTunes playlists to fix it.
Step 1. Go to Settings > Music on your device.
Step 2. Turn off iCloud music library.
Step 3. Open iTunes.
Step 4. Connect your device to your computer with the data cable.
Step 5. Select the Summary tab in iTunes.
Step 6. Select “Manually manage music and videos”.
Step 7. Sync as you would previously.