Recover Unmountable Mac Hard Drive
A hard drive is nothing but space that is reserved for storing system files, user data and software files. When users create partitions, they simply create logical divisions or volumes that can be tagged or reserved for different purposes. Most people like to keep their videos, files and images away from the volume that holds the system data.
When a Mac is booted, the Operating System mounts the local file systems through which the information stored in the logical volumes can be accessed. If for some reason like an error or virus corruption, the file systems become unmountable then to all intents and purposes, people can’t use the information they have in hard disk drives.
Stellar Phoenix Mac Data Recovery to the rescue.
It is a powerful, user friend third party application that can scan and recover unmountable Mac Hard Drive. This utility is a life saver.
The Five Step Process to Recover Data from Unmountable HD on Mac
For the purpose of this tutorial, we have to assume that all the volumes have become unmountable and as such the entire hard disk has to be recovered.
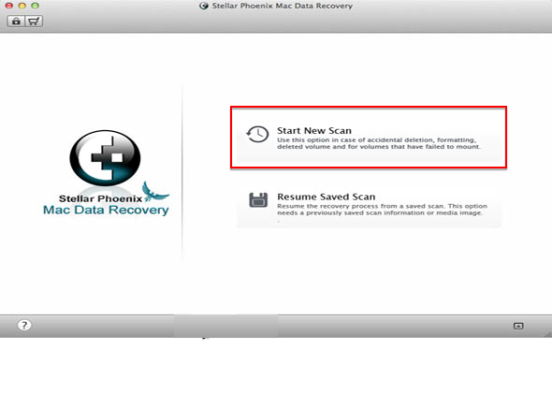
1. Users must launch Stellar Phoenix Mac Data Recovery software and choose the option ‘Start New Scan’ from the home screen. The other choice ‘Resume Saved Scan’ is used to work off of the progress of a scan that was triggered in the past. When selected, Stellar Phoenix draws on the information that is saved in a .dmg file and proceeds from there without initiating scan proceedings from scratch.
2. The next screen is referred to as the ‘Selection Screen’. Here there are three sets of options that users need to choose to customize the scan as per the conditions of data loss.
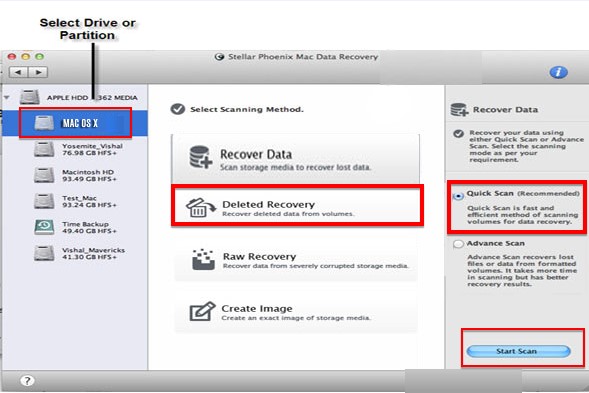
- The first task ahead of users is to select the drive or the external memory device that has to be scanned. The option that is chosen is highlighted in blue. For this tutorial, it is the hard disk of Mac OSX. If a drive hasn’t been given a name by the user, it might show up as ‘No Name’. A great thing about Stellar Phoenix is its ability to remember memories and drives. The list holds the name and make of all the units it has ever scanned.
- The second thing that users need to do is choose the scanning method. The options are present in the middle of the screen. For this tutorial, ‘Recover Data’ is recommended. ‘Deleted Recovery’ is for files that have been deleted by users and ‘Raw Recovery’ is for the salvaging of severely corrupted files and drives.
- The last setting determines the depth of the scan. The scan mode ‘Quick Scan’ is a good match for the ‘Deleted Recovery’ scanning method. To retrieve data from an unmountable hard disk, ‘Advanced Scan’ can get results since it is more powerful and takes longer to culminate.
With all the right settings in place, clicking the ‘Start Scan’ button initiates the process.
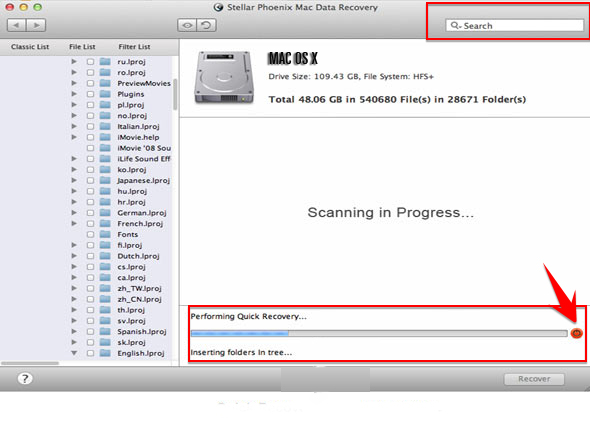
3. Stellar Phoenix presents a progress bar to declare that a scan is underway. This bar notes the time to completion. It has a Stop button to its right which can be used to terminate the scan mid-way. Doing so however auto creates a .dmg file of the scan progress and saves it for resumption at a later date. The stop functionality is there for two reasons. In case of a lengthy scan, it rests the Mac processor. And it can be used to recover data in real time. The panel to the left of the screen displays information as it is identified for retrieval. If users spot an item that they feel is important, they can choose not to wait for the scan completion and can render the ‘Recover’ button clickable by stopping the process.
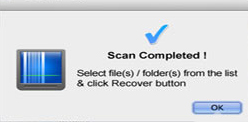
4. A scan that is successfully completed shows the following pop-up. Clicking the OK button transitions the screen to the display mode. Here data is organized in three settings and individual items can be called up with the help of the search bar to the upper right corner.
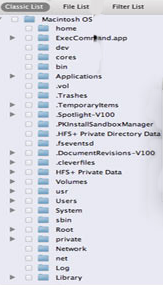
– The Classic List is the most familiar. The files that are recoverable are placed in folders with the same names as the folders in which they were originally located prior to the data loss.
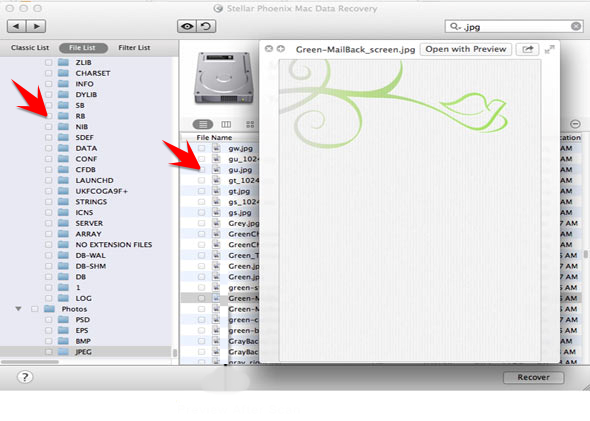
– The File List is the easiest to drill down and use. Here retrievable files are organized in primary folders corresponding to broad data categories like Images, Videos, Notes, Executable Files and more and sub folders that stand for the various data types under the umbrella of the data categories. For example, if an MP4 video can’t be accessed because of an unmounted volume, then users need to first click on the primary folder ‘Video’ and then on the sub-folder ‘MP4’ to find and select the file. Files can be selected in bulk or individually with the help of the right checkboxes. Since the objective here is complete hard drive recovery, it’s best to choose all the primary folders.
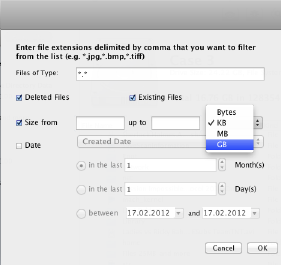
– The Filter List is the most advanced view. It allows users to zero in on particular files using very specific criteria like file type, file size and date of creation.
5. The last thing left to do is click on the ‘Recover’ button so that the items that have been ticked can be saved in their original formats to a safe location. In this case since the system files have failed to mount, it is best to send the data to an external drive or memory stick that is connected to the Mac.
![]()
Using the Stellar Phoenix Mac Data Recovery to recover an unmountable hard disk in its totality is a very simple and intuitive process. Recapitulating the sequence:
- Launch Stellar Phoenix and select ‘Start New Scan’.
- Next choose the drive, the scanning method, and the scan mode.
- Allow the scan to run its course.
- Choose all the primary folders.
- Recover them to an external memory.