How to Migrate to a New Mac
How to Migrate to a New Mac: 2 Ways, Their Pros & Cons
Purchasing a new Mac laptop is a moment of pride for all Apple users. But with this jubilation comes the logistics of facilitating the transition. In short, you must transfer your existing data from the old Apple computer to the brand new device.
If you have gone through this process several times, you have your own set of preferences to make the deal less tedious.
However, if you are a migration novice then you should pay very close attention to this article because there are two distinct ways in which you can go about the task.
Let’s dive into the specifics on how to migrate to a new Mac without compromising your data and settings and without frustrating yourself.
The Two Ways to Migrate
- Migration Assistant: The Mac OS comes equipped with a nifty tool – The Migration Assistant – which is a facet of the Setup Assistant. It is the job of the Migration Assistant to copy over all data (including images, videos and documents) and application and system settings to the clean canvas of your new device. The process is mostly automatic and doesn’t engage your resources. You can trigger the sequence and go about your day.
- Manual Process: Why would anyone want to go the manual route when there is a utility specifically designed to expedite migration? The only upside of the manual recourse is you get to choose what you import to your new Mac. Often power users upgrade their OS several times. With this kind of layering of applications and system files – with the Migration Assistant – almost everything is copied over, regardless of its redundancy or usefulness. You might clutter your clean device with items you don’t need. You will have to invest more time but you will also have a streamlined computer that will operate faster.
Using the Migration Assistant
While using the Migration Assistant, you must ensure that the Time Capsule backup from which you will copy over the data and your new machine are connected to the same network. If this isn’t possible, you might want to directly connect the two Macs together with a Thunderbolt, Firewire or Ethernet cable.
1. If you don’t do regular backups, visit your Time Machine and take one final backup of the information and settings contained in your old Mac device.
2. Do you run your Time Machine on your Apple system? Under such circumstances, ensure that the two Macs are either joined with a suitable physical cable or through the same Wi-Fi network. Running the Time Machine on a USB device? Eject it from the old Mac and attach it to the new machine.
3. Now shut down your old Mac and fire up the fresh device.
4. Choose the option “Go” in the Finder app and from the Utilities section select “Migration Assistant”.
5. The Migration Assistant always forces all other applications to shut down. This is normal. Go ahead and click OK to this request on the modal.
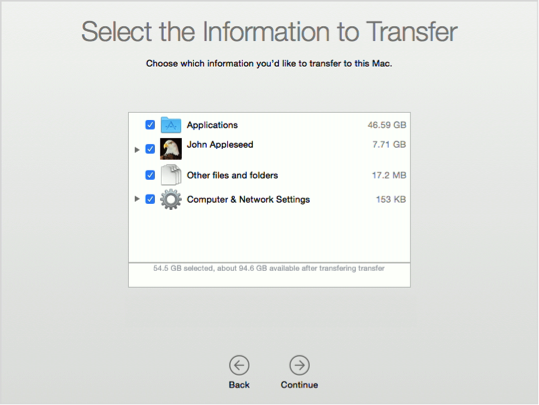
6. Finally choose the option “From a Mac, Time Machine backup or startup disk” when prompted to indicate the source of the information that has to be copied over. Find the Time Capsule located on the same network (this is the Time Machine backup taken from your old Mac machine) as the new Mac, choose the name of the device from which the backup has to be migrated, and tick all the boxes indicating the types of data to be shifted.

7. Wait for the migration to conclude. Depending on the volume of data, the process may take anywhere between an hour to a few hours.
Going Manual
The very first thing you have to do is run the Setup Assistant which will guide you to create an empty user profile and assign it a password. This is how your new Mac machine is configured to receive the data from your existing Apple device.
1. Take stock of all the applications requiring migration. If you have purchased or downloaded apps from the Apple store then these utilities will have to be re-downloaded. They can’t be shifted from one machine to another. However the execution files of third party applications can be easily copied over from the old Mac through a USB device and then installed on the fresh machine.
2. Duplicate your Home folder. Observe how the files and folders are organized within the Home folder (the one with the house icon) of your old Mac device. Replicate this structure and populate it with the contents of the Desktop, Documents, Downloads, Movies, Music, and Pictures folders. Bring over only what you need. The rest can be offloaded to your iCloud account.
3. Don’t forget the Library Folder. This one isn’t exactly conspicuous so many users tend to overlook the container. But it holds important settings and data like your native account emails, font files, iTunes plugins and Safari bookmarks. Sort and sift the information and copy over the essentials.
And that’s about it on how to migrate to a new Mac. Migrating to a new Mac warrants some time and attention. If you lay the foundation right, you don’t have to worry about recovering lost files later down the line.
